
Standard Slogurk Pt. 3: How to Play Gurk
01/20/2024
This is the third time now that I'm writing about my pet deck in Standard, Slogurk. The first time, I talked about the core loop that gave the deck its power, and how I was building it pre-LCI. The second time, I talked about how the addition of Inti from LCI turbocharged the deck, introducing more redundancy and the ability to utilize
Relic of Legends as a powerful mana engine.Now, I come to you one last time (probably; I'm going to be focusing on limited and pioneer for the PT) to talk about how to pilot the deck. It's quite complex, with lots of small micro-optimizations to make, so there will be plenty to go over! But I'll also fit in my latest list (now with white!) and sideboard guide at the end.
Part 1: Fundamentals
This will be a quick overview, as I already went over most of this in my previous two articles, but want to put it here as well to have it all in one place.
The End Goal
The end goal of this deck is to get to a state where you have infinite card advantage and value that you can cheaply translate to an unbeatable board position. You can think of the deck sort of like a prison deck in that sense - at some point, there is nothing your opponent can do that matters.
The key to this boardstate is the interaction between
Slogurk and the NEO channel lands - with Slogurk in play, you can channel three channel lands, putting 3 counters on Slogurk, and then activate Slogurk's ability to bounce it to hand and get those lands back. This lets you essentially use any channel lands you have as many times as you want, so long as you have the mana for them.Once you're at this point, your only limit is mana. Once you have three legends on the battlefield, you can get channel costs down to only 1 mana - but Slogurk still costs 3 mana to replay, and it's still nice to have access to more.
So, that's what we have
Relic of Legends for - now all of our legends produce a mana (with haste!), and Slogurk essentially costs 2 to bounce and replay, as you can tap it for mana first. Rona helps even more, as you can tap it for mana to cast a legend and get the untap trigger for free, thus making Slogurk effectively cost 1 mana!In the end, this means that if we can get Relic, Rona, Slogurk, and a third legend in play, then we can pay 1 mana for each of our channel lands and 1 mana to get them all back. At this point you'll probably have access to 8+ mana as well, which translates to 6+ channels.
a short clip demonstrating a typical turn of running the engine
Gameplay Tip - Make Sure to Use All Your Mana
One common small mistake I see people make with this deck is not running the engine enough. When you have Relic, Slogurk, and three legends in play, it's often good to spend all of your mana running your engine.
I often see people end the turn with a Slogurk with 3 counters on it and 5+ mana available - it's often correct in those spots to bounce and replay gurk before passing. A good rule of thumb is that you want to run the engine as much as possible on your turn until you get to the final time you're replaying Slogurk, and then do the final bit of channeling lands on your opponent's turn - that way, you get to use all of your mana.
I also see people attacking a bit more than I would. Ending the game is important at some point, but just keep in mind the opportunity cost - attacking with a legend often means losing 1 Relic mana, which translates to channeling one fewer land. This also applies to looting with Rona - if you have your engine setup, often it's a lot better to tap Rona for mana, even if you have Inti in play.
Invalidating Permanents
Once you have the engine setup,
Otawara invalidates any nonland permanents (and even creature lands!) your opponent has - decks just can't keep up with their whole board being bounced every turn. One of the funnier play patterns with this deck is when a domain opponent casts Herd Migration, and you proceed to channel 5 Otawaras on your turn to get rid of it.Invalidating Removal
Repeated Otawaras also invalidate any removal your opponent might have - you can simply respond by bouncing the thing they're trying to remove to hand. Even a Sunfall isn't scary at all when you're setup - you can Otawara twice to bounce two legends to hand, and then bounce Slogurk to its own ability.
Invalidating Spells
At some point, you can also hold up enough mana to to either Otawara or
Takenuma an Ertai to hand and then cast the Ertai - or even enough mana to do that multiple times in one turn. At that point, you can make it pretty impossible for your opponent to resolve relevant spells.Gameplay Tip - Holding Up Ertai
I said above that once you have your engine running you should spend all your mana on it - this isn't quite true, as often you also want to hold up 1 or even 2 Ertais.
The first Ertai generally costs 4-5, but the second generally only costs 3-4 past that (as you can tap Rona and maybe the first Ertai for 2 mana). As such, the first Ertai doesn't cost much to hold up (you can probably spend that mana on channeling if you don't need to Ertai, and you can often overlap this with holding up
Plaza), but the second definitely eats into your engine a bit.Always have a plan for how much mana you want to have open when passing.
Invalidating Life Totals
And finally, if you have a
Titania in play as you run your engine, you will very quickly get your life total out of any possible burn range.Part 2: The Early Game
So now that we know where we're going and what our goal is: how do we get there?
Well, one important part is getting a critical mass of legends in play - even before you assemble the engine completely, you often want to channel your lands, and Takenuma specifically can be quite important to getting setup.
Because you want a critical mass, you generally should avoid trading off your legends if possible. There may be spots where you have to - especially against a deck like mono-red - but you should default to trying to keep legends in play.
Relic is probably your most important piece in getting setup - I find it hard to mull any hand that can cast it. It just provides so much mana even when you're starting to get setup, accelerating you by multiple turns. It can sometimes even be better to cast it on turn 3 instead of casting a legend - often when the opponent seems to be holding up removal.
You might also notice that I haven't mentioned
Inti yet. That's because it's not essential to the final engine - if you have all your pieces, you don't need to impulse draw more cards. And in fact, it can occasionally become a liability at some point, as it tears through your deck too fast while you're running your engine and might deck you (thankfully, you can just remove it with Otawara).What Inti is for is assembling the engine. It's a potent card draw engine with Rona, and translates every channel land into drawing towards more pieces.
One of your nut draws is simply curving Rona on turn 2, into Inti+Relic on turn 3. This then lets you immediately either loot with Rona or channel a land to trigger Inti, and sets you up to have access to a lot of cards the next turn.
Gameplay Tip - Don't Run Out Naked Gurks
Because this deck functions at a critical mass, you generally lose by your opponent successfully going 1-for-1 with you. Thus, you should generally try to make it so that your Intis and Slogurks don't die for minimal value.
Casting Slogurk on turn 3 is pretty sketchy against decks that are likely to remove it. You should try to at least have lands in your graveyard first, but the ideal situation is to have a Takenuma or Otawara up so you can respond to removal.
Likewise, casting Inti on turn 2 also isn't ideal - you should almost always lead on a different 2-drop if possible. Still, usually casting Inti will be better than doing nothing, especially since it enables channeling the next turn.
Notably, Relic is very nice for giving you the ability to hold up a channel land right after playing Slogurk or Inti - Relic on turn 3 into Slogurk on turn 4 naturally holds open 3 mana for Otawara or Takenuma.
Part 3: Finesse
There's quite a few neat tricks you can do in this deck that can come up. There's not a great way to fit them in naturally, so I'll just fire some off here:
Slow Gurk Loops
Sometimes in the midgame, you run into a problem where you have a Slogurk, but you don't have channel lands in hand, or at least not enough that you can start looping Slogurk. In these spots, it's pretty common for there to be lands in your graveyard - just not in your hand. So what do you do?
Any single Otawara in hand can jump-start the loop, as you can simply bounce Slogurk, and get back Otawara and two other lands.
If one of the lands in your graveyard is a Takenuma, you can just have Slogurk die! Slogurk can get back Takenuma, which can then get back Slogurk - and in this process you also rebuy two lands. This loop is generally slower, especially if you're relying on Slogurk dying instead of bouncing it to hand, but you can boostrap it into the larger loop with an additional Takenuma to charge up Slogurk, or Otawara to bounce Slogurk and generate more lands.
You can also try to charge up Slogurk with other sources of counters - examples include cycling triomes, looting away non-channel lands with Rona, or just attacking with Inti. Discarding a land to Inti's attack trigger targeting Slogurk gives 2 counters, which should generally get you towards the 3 you need! Anything that can give a counter or mill/discard cards can work here - and often the first Slogurk bounce is enough to carry you through to the next one.
Kickflipping with Ertai
The main use for Ertai is killing/countering something of your opponent's. But sometimes you just want to get a legend on the battlefield, and/or don't want to give your opponent a card. Thankfully, Ertai can target your own things too!
The above situation is a good example - maybe you want to kill your own Slogurk! And while you generally don't want to kill your other legends (as you want critical mass), you can also counter triggers. Some prime sources of triggers you're happy to throw away for a card include: Inti's "on attack" or "+1/+1 counter" triggers, Rona's untap trigger, a Titania lifegain trigger, a Slogurk counter that you don't need to get to 3.
The fanciest case of this is in response to your opponent's
Tishana's Tidebinder: instead of countering the Tidebinder or its trigger, you can counter the trigger of yours that Tidebinder is targeting - then your creature still keeps its ability, as Tidebinder's trigger fizzles, and you get to draw a card instead of giving them a card. (However, you should not do this if your trigger itself is very important - most notably Slogurk's leaves-the-battlefield trigger).End-Step Inti Draws
Inti's impulse draw says "until your next end step", so notably if you trigger it on your end step, you get those cards until the end of your next turn. So, if you're not planning on playing any more cards exiled with Inti this turn, but want to channel lands during your turn before your opponent untaps, then you can do so on your end step to delay Inti's cards to next turn.
This actually comes up most often with having Rona and Inti early. If you go turn 2 Rona into turn 3 Inti, you don't really have the ability to cast any spells off of Inti, so you don't want to loot main phase - but at the same time, if you wait until your opponent untaps, they could remove Inti in response to you looting. So, your end step often becomes the best window to loot.
The Legend Rule is Positive
It might see counterintuitive, but often in this deck you should actively try to play your legendary channel lands off of Inti - especially any copies Otawara and Takenuma. This is so that, if you exile multiple of the same channel land, you can guarantee that at most one of them is stuck between play and exile, instead of in your hand or graveyard.
Of course, sometimes you care more about hitting land drops that are more permanent or have better colors, and sometimes you care about having more Plazas in play. But a lot of times it'll be very relevant that you can legend rule an Otawara from exile, and then get it back with Slogurk. Doing so even triggers any Slogurks or Titanias you have in play!
End-Of-Combat Eiganjos
One thing to keep in mind is that you can't float mana before combat damage and then use it afterwards - this is most relevant when you're trying to either Takenuma something that trades in combat, or trade off Slogurk and use pre-combat-damage mana to channel lands in the end-of-combat step.
However, one thing you can do is get back an
Eiganjo from Slogurk trading in combat, and then Eiganjo an attacker in the same end-of-combat step.Part 4: 5c Gurk
Hopefully now you have an idea of how to play this deck. I'll cap it off with the current list I've been playing, as well as notes on card choices and a bit of a sideboard guide.
The Deck
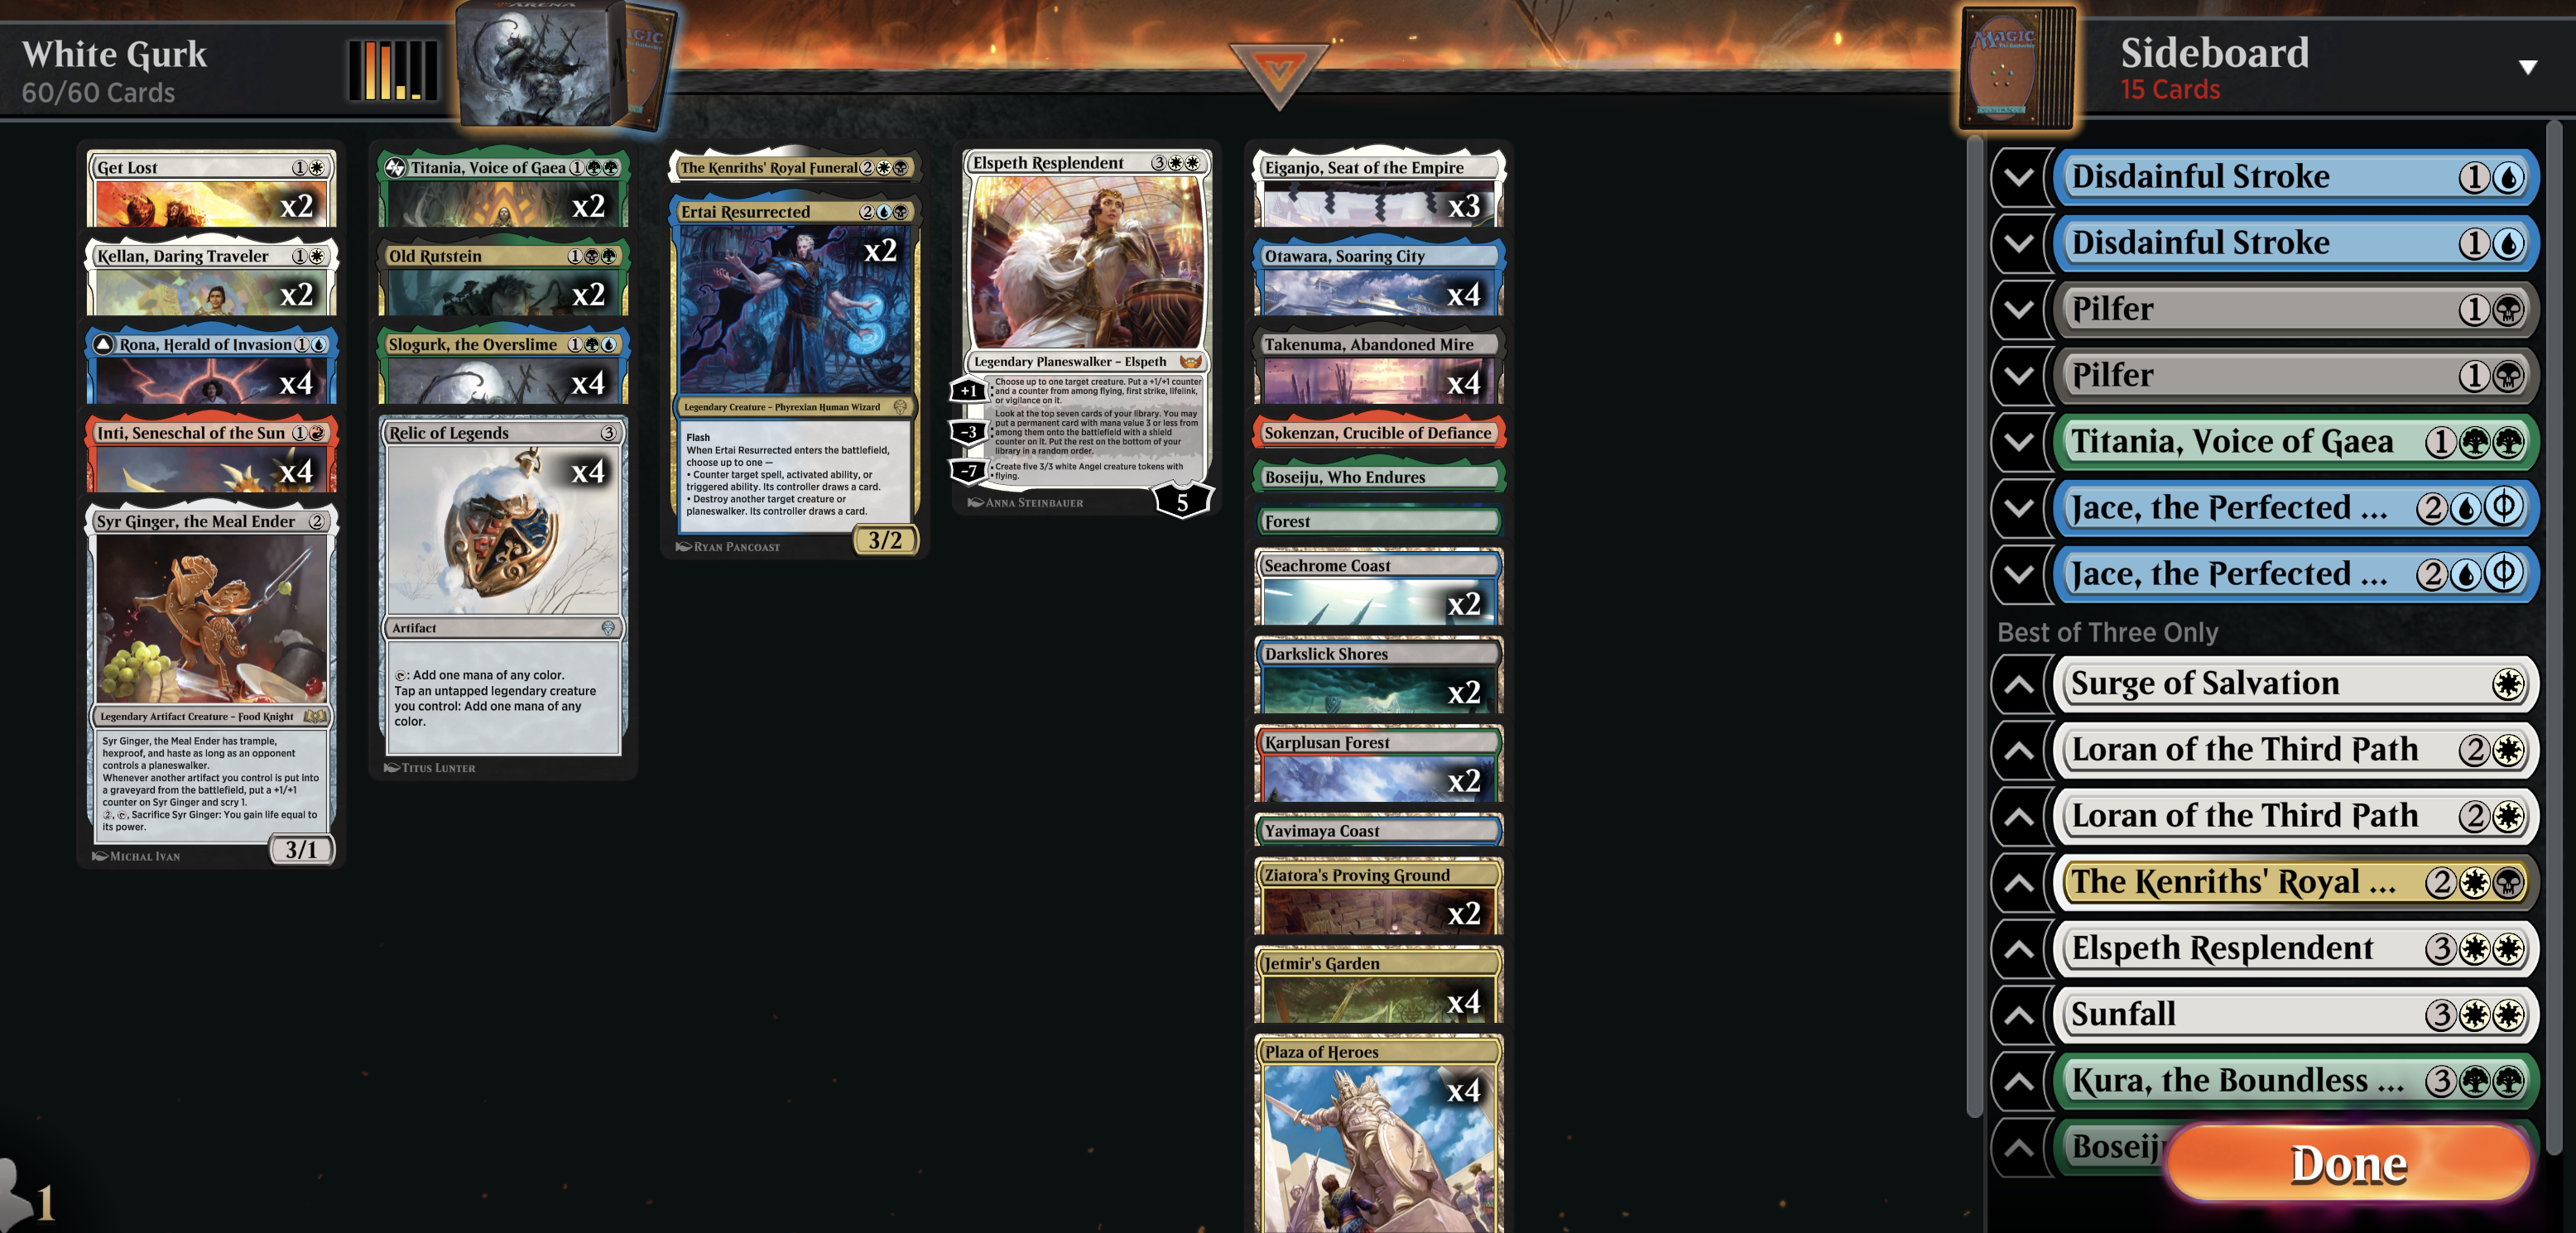
my current list, with white added
You might notice that this list is the full five colors, adding white compared to previous lists. This is mainly for two reasons: I wanted to play with Eiganjo instead of cards that were only spot removal like Cut Down and Go for the Throat, and I think
Kellan, Daring Traveler is just a better version of Glissa Sunslayer for this deck.You also get access to
Elspeth Resplendent and The Kenriths' Royal Funeral, both of which are powerful setup cards (though are mediocre in some matchups, hence the 1/1 split for both).Elspeth serves as roughly additional copies of Slogurk and Relic - as the -3 can often find you the piece you're missing - as well as another source of lifegain to fight aggressive decks.
Funeral serves as a way to refill your hand, and also sets you up to turn the corner extremely quickly. With two legends exiled, your 2 mana legends now cost 1, and everything else now costs 2 - so notably that's costing 0 or 1 mana with Relic in play, and immediately producing 1 or 0 mana with Rona also in play.
Funeral also enables an infinite combo! If
Syr Ginger, the Meal Ender costs 0, then you can use Otawara on Syr Ginger to pay 1 mana to bounce it, and then recast it and untap Rona for +2 mana. This means you get to channel Otawara for +1 mana, and as discussed above replaying Slogurk costs 0 mana net, so you can get infinite channels if you have three channel lands, which then wins with Sokenzan (or Takenuma finding Sokenzan).This infinite needs somewhat specific pieces - Funeral with 2 exiled, Rona, Relic, Slogurk, Syr Ginger, Otawara, and one other channel land - but with how much Funeral accelerates you it's not that hard to assemble once you have Funeral down. In fact usually the play pattern is that the turn after I play Funeral I dump my hand and stabilize, and then the turn after that I'm infinite.
To Eiganjo or not to Eiganjo
Overall, I'm kind of torn one whether I like the 4c version or the 5c version with white better. After playing with it a bunch, I think I'd say that the white version is worse against the Bx midrange decks, most notably Esper, but better against basically every other deck.
It's unclear exactly what that means on balance, but I also think that the 4c deck is more optimized, whereas the 5c deck has more room to grow - I certainly don't think this build is quite optimal yet, and there's still several cards that are more in the experimentation phase.
MKM will certainly bring some changes, both to the meta and to Slogurk. So we'll see.
Sideboarding
If you want a condensed, all-in-one-place version of this guide, here's a spreadsheet.
Domain
In: 1 Boseiju, 2 Jace, 2 Disdainful Stroke, 2 Loran, 2 Pilfer
Out: 1 Forest, 1 Titania, 2 Get Lost, 2 Kellan, 1 Elspeth, 1 Syr Ginger, 1 Funeral
Some people (who may or may not be named Andrew) say that Jace is unnecessary in the Domain matchup, but I disagree. It helps a lot with coming back from behind - as otherwise you can sometimes fail to kill them before decking - and also legitimately helps with the clock problem, which is even a problem in paper. It's not enough for me to be playing one maindeck, but I still really like the two sideboard.
Cutting Get Lost looks weird, but Loran is mostly just better. Leaving in 1 Titania helps a lot vs how they actually win - by pressuring you with angels and Herd Migrations. And Funeral, while theoretically pretty nice, is unfortunately a bit too vulnerable to Leyline Binding.
Esper Midrange
In: 1 Boseiju, 1 Titania, 1 Kura, 1 Sunfall, 2 Pilfer
Out: 1 Forest, 2 Old Rutstein, 1 Elspeth, 1 Funeral, 1 Syr Ginger
Pilfers are primarily for Tidebinders, and Funeral is being cut mostly because of Dennick. If you're playing against a list with no Dennicks, then the Funerals are actually good, and you should probably leave out Sunfall and maybe cut Kellan instead.
If they're on a version with many Weddings and Virtues, you can bring in Lorans, but I'm not sure what you cut.
Also notably this is the matchup I'm least confident in the sideboard for. I suspect that you might want some Lithomantic Barrages just for this matchup.
Rakdos, Golgari, Bx Midrange in general
In: 1 Boseiju, 1 Funeral, 1 Elspeth, 1 Kura, 1 Sunfall
Out: 1 Forest, 1 Titania, 2 Get Lost, 1 Kellan
Not much to say here, the expensive sticky cards (Funeral, Elspeth, Kura) are just really good vs non-Esper black midrange decks.
Rakdos Ramp (big)
In: 1 Boseiju, 1 Funeral, 1 Elspeth, 2 Jace, 1 Kura, 2 Stroke, 2 Pilfer
Out: 1 Eiganjo, 1 Rona, 1 Inti, 2 Titania, 2 Get Lost, 2 Kellan, 1 Syr Ginger
This might be overboarding, but you legitimately do want both the domain cards and the black midrange cards. You generally need to keep Forest in these matchups, as they generally play Field of Ruins - Eiganjo doesn't have much use here.
Mono-Red
In: 1 Boseiju, 1 Titania, 1 Elspeth, 1 Surge of Salvation
Out: 1 Forest, 1 Ertai, 1 Syr Ginger, 1 Funeral
This matchup is mostly about Titania and Elspeth, and Ertai and Funeral are pretty bad. Much more than this is definitely overboarding, though you could consider bringing in 1 Loran for Kumano purposes (and technically Urabrask's Forge, though that card isn't particularly scary).
Bant Toxic
In: 1 Boseiju, 1 Funeral, 1 Surge of Salvation, 2 Loran, 2 Pilfer
Out: 1 Forest, 2 Titania, 2 Get Lost, 1 Old Rutstein, 1 Elspeth
This is the main reason for Surge of Salvation - it counters the Rotpriest+March combo. Pilfers are also here to take March, as it's mostly the only card you care about. Nicely we get to cut Titania, as our life total already doesn't matter.
Mono-W Toxic
In: 1 Boseiju, 1 Funeral, 2 Loran
Out: 1 Forest, 2 Titania, 1 Elspeth
This is like Bant Toxic, but instead it's unloseable because they never have March.
Soldiers
In: 1 Boseiju, 1 Titania, 1 Funeral, 1 Sunfall, 2 Pilfer
Out: 1 Forest, 2 Get Lost, 2 Kellan, 1 Elspeth
Unclear how much of a deck soldiers is right now. Spot removal is bad here, Pilfers are for Tidebinders and counterspells.
Helping Hand Mentor
In: 1 Boseiju, 1 Titania, 1 Funeral, 1 Sunfall
Out: 1 Forest, 2 Kellan, 1 Elspeth
Unclear if this still exists; the matchup can be scary if they get Mentor in play repeatedly but is otherwise pretty favored, because Haughty Djinn does not line up well vs Eiganjo and Otawara.
Generalized Aggro
In: 1 Boseiju, 1 Titania, 1 Sunfall, maybe Elspeth and Loran
Out: 1 Forest, 1 Syr Ginger, 1 Funeral, maybe Elspeth, Get Lost, or Old Rutstein
Generic aggro decks (humans, gruul picnic, etc) are very good matchups for Slogurk. You usually want Elspeth unless they have a lot of flying, and you sometimes want Loran if they have a lot of targets.
Generalized Control
In: 1 Boseiju, 1 Funeral, 2 Jace, 2 Stroke, 2 Pilfer
Out: 1 Eiganjo, 2 Titania, 2 Get Lost, 1 Kellan, 1 Elspeth, 1 Syr Ginger
You don't need Syr Ginger when you have Jace, as you can just turn your Funeral engine into milling them out pretty easily.
The Mirror
In: 1 Boseiju, 1 Funeral, 1 Elspeth, 2 Jace, 2 Loran
Out: 1 Forest, 2 Titania, 2 Get Lost, 2 Kellan
This matchup is a race to assemble the engine. The thing that matters most is killing their Relic of Legends - or sometimes just bouncing it on the turn you go off.
Conclusion
And that should be everything! This is probably the last time I'm writing about Slogurk for a while, but hopefully this has been a pretty comprehensive overview of how the deck works and how to play it.
If you want more discussion on Slogurk, feel free to join the Discord I made recently! It's where all the cool slimes are :)
Good luck in your RCQs, and perhaps in Chicago!

#FreePalestine | Consider donating to UNWRA or PCRF, supporting protesters locally, and educating yourself.